Discovered Segments
Overview
Engage can automatically discover segments for you by mining online behavioral data and clustering users into audiences. You can then create a segment from an audience by simply clicking to create the segment. Discovered Segments use machine learning and a clustering approach to identify specific audiences that are either outperforming or underperforming based on key metrics (for example, CTR, RPV, AOV, or Conversion Rate).
To access Discovered Segments:
-
On the Omnichannel Personalization dashboard page, go to Content > Segment Library.
The Segments page is displayed.
-
Click the Discovered Segments tab.

Filter Options
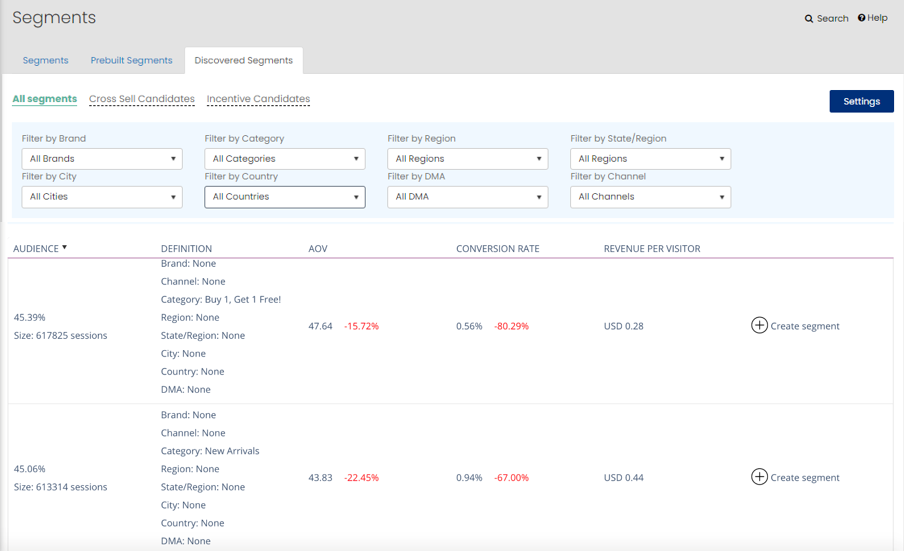
A set of pre-defined filter options enable you to see the audiences that match on those filters. The predefined filters narrow the audiences to those that you would want to provide incentives to purchase or add cross-sell options to expand their average order value.
-
All Segments: Displays all audiences identified.
-
Cross-sell Candidates: Identifies all audiences where the conversion rate is higher than average and AOV is lower than average.
-
Incentive Candidates: Identifies all audiences where conversion rate is lower than average and AOV is higher than average.
In addition, you can filter audiences further by combinations of the following options:
-
Brand
-
Category
-
Channel
-
State/Region
-
Country
-
DMA (Designated Marketing Area)
-
City
Table Columns
The table consists of the following columns:
-
Audience: The size of the audience as a total number and percentage of sessions.
-
Definition: Description of the audience in terms of the following fields: Brand, Category, Channel, State/Region, Country, DMA, and City.
-
AOV: Average order value for current audience, and the difference as compared with the average for all audiences.
-
Conversion Rate: Conversion rate for current audience, and the difference as compared with the conversion rate for all audiences.
-
Revenue Per Visitor: Revenue for current audience.
-
Create Segment: Enables you to create a segment for the audience in your segment library.
You can sort audiences by click on the column headers. For example, you can filter by Incentive Candidates and sort by highest to lowest AOV to see opportunities where an incentive may be impactful for an audience with high AOV and low conversion rate.
Note: In case the discovered segment has conditions that are not available in segments, a segment and context with same names will be created.
Note: The table shows only 100 audiences after applying filters and sorting. Use filter and sorting to get the needed result.
Configuration Options
To enable Discovered Segments:
-
On the Segment page, click Settings.
-
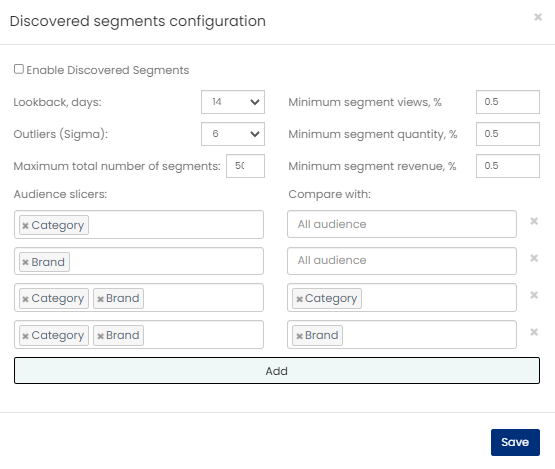
Click the Enable Discovered Segments checkbox to enable the discovered segments.
The settings page includes other options that are available to find segments by considering different combinations of dimensions when the process is mining data.

-
Here you can specify audience slicers to be included. By default, the system will review Category, Brand, or Category and Brand Combinations.
-
Lookback, days: The time period used for audience calculation (default is 14 days).
-
Outliers (Sigma): Outliers cutting rule (6 Sigma, 3 Sigma, 1 Sigma).
-
Maximum total number of segments: Maximum number of audiences that will be included in the result of the process (default is 500).
-
Minimum segment views, %: Minimum percentage of views for the audience to include the audience in the results.
-
Minimum segment quantity, %: Minimum percentage of sessions for the audience to include the audience in the results.
-
Minimum segment revenue, %: Minimum percentage of total revenue for the audience to include the audience in the results.
-
Audience slicers: Parameters that will be used to divide an audience. Slicers can be specified as Brand, Category, Channel, Region, Geography. In case that more than one parameter is specified in the line, the separation will be performed by several parameters at once. For example: users who are interested in products from a brand in a category.
-
Compare with: It is a setting for advanced users that allows you to set audience slices to compare against. The default value is All audience. You can set values only from the “Audience slicers” column of the current row and wider. For example: for “Brands, Categories” you can set only a Brand, only a Category or the All audience.
-
-
Click Save to save the settings.