Creating Guided Selling Campaigns
In Omnichannel Personalization, configuration of Guided Selling involves the creation of campaign and variations to set up the questionnaires based on Seed Category, Seed Product, Product Attribute, and Price, which can be mapped to catalog elements.
Perform the following steps to create a new campaign for Guided Selling:
-
On the Guided Selling Campaigns page, click Create Guided Selling Campaign. By default, the campaign is named 'Guided selling experience'.

-
(Optional) In the Guided selling experience area, click
 to rename the campaign.
 -
Perform the following crucial steps to complete the creation of guided selling campaign.
The Start Screen configuration page allows you to configure the initial interface of the Guided Selling Campaign to set variables, customize styles, and create a welcoming entry point for customers beginning their guided selling experience. The Start Screen page displays the Variables and Style tabs.
To set up the Start Screen page:
-
Click on the Variables tab, select the Enable Start Screen checkbox to activate the start screen for the guided selling campaign, and then specify the following:
-
Start Screen Title: Specify the title for the start screen.
-
Screen Description: Specify a description for the start screen to offer a brief overview or instructions to guide the customer on what to expect.
-
CTA text: Specify the call to action text to prompt the customer to take the next step (for example, Start Quiz, Get Started, etc.).

-
-
Click on the Style tab and specify the following:
-
Background Image: Specify a background image for the start screen to enhance the visual appeal and create a welcoming atmosphere.
-
Title Font Size: Specify the font size for the start screen title.
-
Description Font Size: Specify the font size for the start screen description.
-
Background Start Color: Select a color for the top portion of the background. This can create a gradient effect or a solid color background.
-
Background End Color: Select a color for the bottom portion of the background. This can be used to create a gradient effect or a solid color background.
-
Title Font Color: Select a color for the title text that contrasts well with the background color for optimal readability.
-
Description Font Color: Select a color for the description text that complements the title font color and ensures good visibility.

-
-
Click Save & Proceed. The Quiz page is displayed.
The Quiz step involves creating a series of questions designed to understand the customer's preferences and needs. These questions are based on factors such as Seed Category, Seed Product, Product Attribute, and Price, and help tailor the recommendations provided later. The Quiz page displays the Variables and Style tabs.
To set up the Quiz page:
-
On the Quiz page, click on the Variables tab and perform the following:

-
(Conditional) In the Advanced Options section, select from the below:
-
If you selected Single Path, select the following where all the answer options will lead to the same screen.
-
Select the next proceeding screen that you want to display after the current screen from the available dropdown list.
-
Select either one from the Multi-answer selectionand Log answers to UPS checkboxes.
-
-
If you selected Branch, select the following where each answer option will lead to the configured screen in the Answer section below.
-
Select the Log answers to UPS checkbox.
Note: The Multi-answer selection option is not applicable for the "Branch" option.
-
-
-
In the Question section, specify the following:
-
Display Text: Specify the question that you want to display for the selected screen.
-
This question is a type of: Select the type of question from the dropdown list. Available options are Seed Category, Seed Product, Product Attribute, and Price.
-
Choose Product Attribute: Select the product attribute from the dropdown list.
-
-
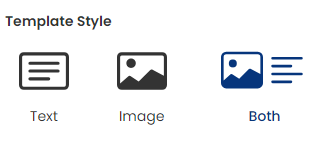
In the Template Style section, select the template style. Available template styles are Text, Image, and Both.

-
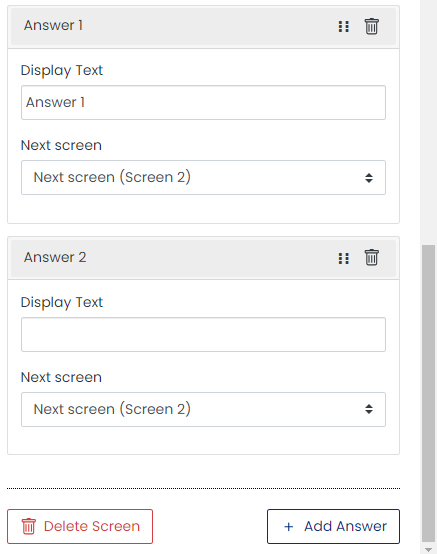
In the Answers section, specify the following details for each answer, such as Answer 1, Answer 2, and so on.

-
Display Text: Specify the display text for the answer.
-
Next screen: Select the next screen to navigate to when an answer is selected.
-
Additionally, you can perform the following actions for any screen:
-
To add a new screen, click + Add Screen.
-
To save the variables and styles specified, click Save.
-
To change the sequence of answers, click
 , hold it, and then move it either up or down.
 -
To delete the answer, click
 on the corresponding answer that you want to delete.
 -
To delete the screen, click Delete Screen on the corresponding screen that you want to delete.
-
To add an answer additionally, click + Add Answer.
-
To customize the configuration, in the Preview area, click View/edit code. System allows you to customize the underlying code in HTML, CSS, and JS.
-
-
On the Quiz page, click on the Style tab and specify the following attributes:
-
Screen Title: Specify the title of the screen.
-
Font Family: Specify the font style for the Screen Title.
-
Background Image: Select a background image if needed.
-
Background Start Color: Select the start color for the background.
-
Background End Color: Select the end color for the background.
-
Question Font Size: Specify the font size for the question.
-
Question Font Color: Select the font color for the question.
-
Answer Font Size: Specify the font size for the answer.
-
Answer Font Color: Select the font color for the answer.
-
Answer Background Color: Select the background color for the answer.
-
Selected Answer Border Color: Select the border color for the answer.
-
Progress Bar Foreground Color: Select the color for the progress bar foreground.
-
Progress Bar Background Color: Select the color for the progress bar background.
-
Back Button CTA: Define the appearance and text for the "Back" button.
-
Next Button CTA: Define the text and look of the "Next" button.
-
Submit Button CTA: Define the final step’s button text and design. This is to specify the label and style for the Submit button (e.g., “Submit Answers” or “Get Recommendations,” with colors.

-
-
Click Save & Proceed. The Recommendations page is displayed.
In the Recommendations step, configure the logic and criteria for suggesting products to customers based on their quiz responses. This ensures that the products shown are highly relevant and personalized to each customer's specific requirements. The Recommendations page displays the Configurations and Style tabs.
To set up recommendations:
-
On the Recommendations page, click on the Configurations tab and specify the following:
-
Default Region Id: Specify the default region identifier to localize recommendations.
-
Default Currency Symbol: Specify the symbol for the default currency (for example, $, €, £).
-
Default Currency Location: Select from the available options for currency symbol placement. Available options are Prefix and Suffix.
-
Prefix: Places the currency symbol before the amount such as $100.
-
Suffix: Places the currency symbol after the amount such as 100$.
-
-
API Client Key: Specify the API client key to authenticate requests for recommendations.
-
Site API Key: Specify the site API key for secure communication between the recommendation engine and your site.
-
Default Category Seed: Select the default category seed to be considered when generating recommendations.
-
Select Strategy: Select the strategy for generating recommendations from the dropdown list.
-
Placement Name: Select the placement name from the dropdown list where recommendations will be displayed.
-
Allow partial matches in results: Select this checkbox to enable partial matches in the recommendation results.
Note: Ensure that the site configurations are enabled for this option to work.
-
Error Message: Define the error message to be shown if recommendations cannot be fetched.
-
Local Storage Variable Name: Specify the local storage variable name to store relevant data for generating recommendations.

-
-
On the Recommendations page, click on the Style tab and specify the following:
-
Font Family: Specify the font family to be used for the recommendations text.
-
Strategy Message Font Size: Specify the font size for the strategy message displayed to the customer.
-
Background Color: Specify the background color for the recommendations section.
-
Product Name Font Size: Specify the font size for the product names displayed in the recommendations.
-
Price Font Size: Specify the font size for the prices displayed in the recommendations.

-
-
Click Save & Proceed. The Full Preview page is displayed.
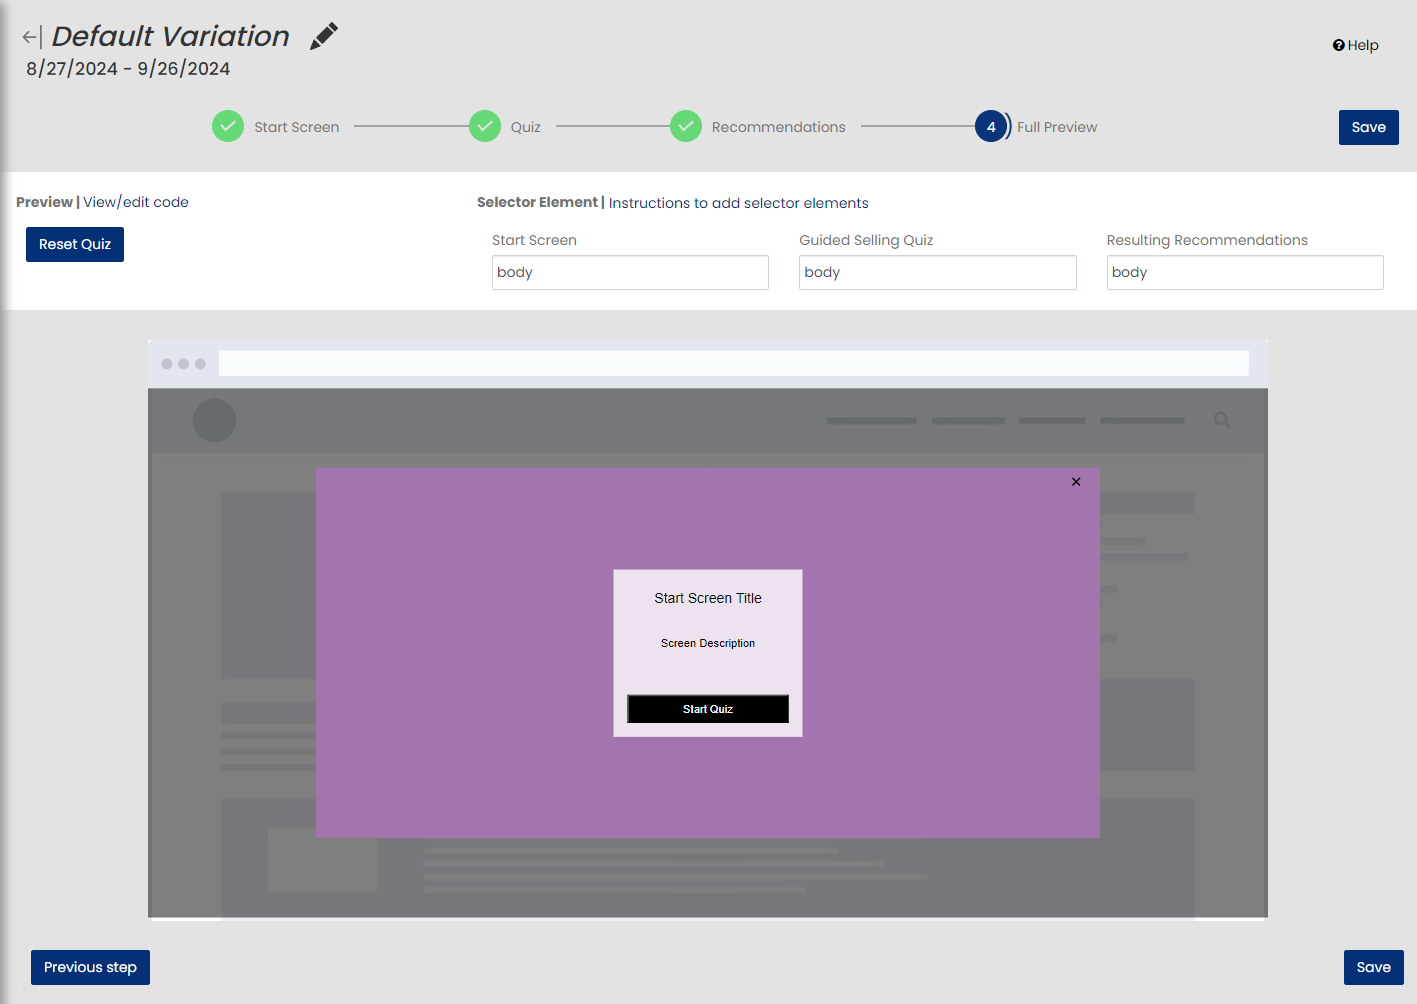
The Full Preview step allows you to review the entire Guided Selling Campaign as a customer would see it. This step ensures that all elements work seamlessly together, and that the customer experience is smooth and engaging before the campaign goes live.

Perform the following on the Full Preview page:
-
(Optional) To view or edit the underlying code of the guided selling campaign, click View/edit code.
-
(Optional) To reset the quiz and start over, click Reset Quiz.
-
In the Selector Element area, specify the selector element for the following to ensure they accurately reflect the customer's preferences and needs.
-
Start Screen
-
Guided Selling Quiz
-
Resulting Recommendations
Instructions to add Selector Elements:
Selector Element is the location selector identifier where we want to display the guided selling message. It could be a Cart button or Item Image on the Item Page (or PDP Pages). To place the message at the right location, it is important to identify the correct UI component and identifier and use that parameter for inserting the guided selling message.
The location selector can be an XPATH, ID, or class selector for the element for which the guided selling message is inserted on the page followed by a hash (#) or dot (.).
It is important to keep the following aspects in mind while choosing the location selector:
-
It should be unique on the Item Page. If the identifier is present in multiple places on the Item page, then the message may not be able to display at the required location. Therefore, check if the chosen identifier is unique. If not, select a different identifier.
-
If there is no unique identifier, then add an identifier that is unique for the message location.
-
It should always be followed by a hash for ID & dot for class (See examples below). Tags can be used directly like p, div, etc."
-
-
To save the campaign configurations, click Save.
After thoroughly reviewing the Full Preview page, you can ensure that the guided selling campaign provides a seamless and engaging experience for your customers.