Creating Social Proof Campaigns
Perform the following steps to create a new campaign for social proof:
-
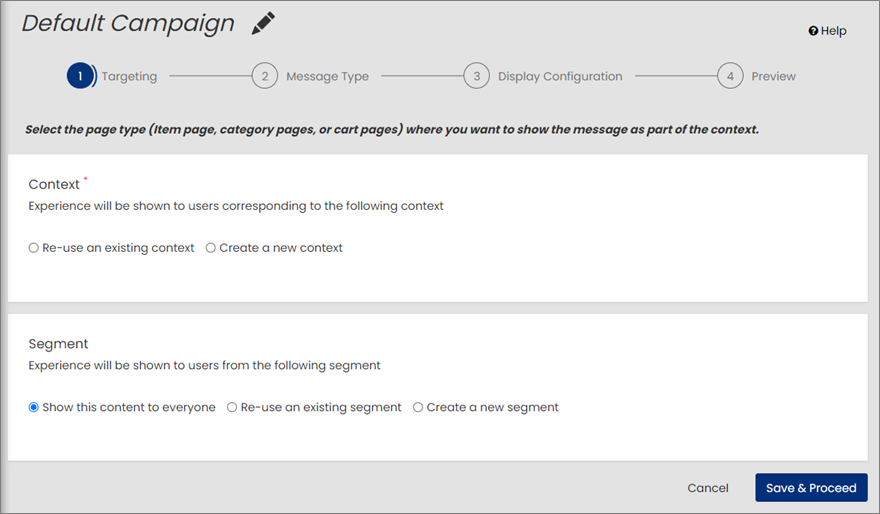
On the Social Proof Campaigns page, click Create Campaign. By default, the campaign is named ‘Default Campaign’.
-
In the Default Campaign area, click
 to rename the campaign.
 -
Perform the following crucial steps to complete the creation of Social Proof Campaigns.
-
Targeting: This step allows you to define Context and Segment, and select the page type for the social proof campaign.
-
Message Type: This step allows you to configure and personalize the social proof messages based on the priority, event type, message text, threshold value, single or multiple messages with display time, and so on.
-
Display Configuration: This step allows you to set up the styling and position of the social proof message.
Note: Creating a variation for social proof campaign can be accomplished by performing the Message Type and Display Configuration steps.
-
Preview: This step allows you to view the details of the social proof campaign and publish either to the Production or QA/Integration environment with defined traffic percentage of audiences.
-
The Targeting step allows you to define both context and segment, as well as select the page type for the social proof campaign.
Perform the following steps to define the context and segment:
-
Choose the context to define which customers will see the content by selecting an appropriate context.
- Notes:
- Context must include the page type (Item Page/List Page/Cart Page/Email Page) based on where you want to display the social proof message.
-
You can add additional criteria to restrict the social proof message to specific categories, brands, or products.
-
You can either re-use an existing context or create a new context:
-
Re-use an existing context: Select this option to re-use an existing context.
To proceed with selecting an existing context, follow these steps:
-
In the Context name field, specify the name of the existing context you want to select.

-
Select the context from the search result and ensure that the correct page type is displayed for the selected context.

-
-
Create a new context: Select this option to create a new context, allowing you to customize it based on your preferences.
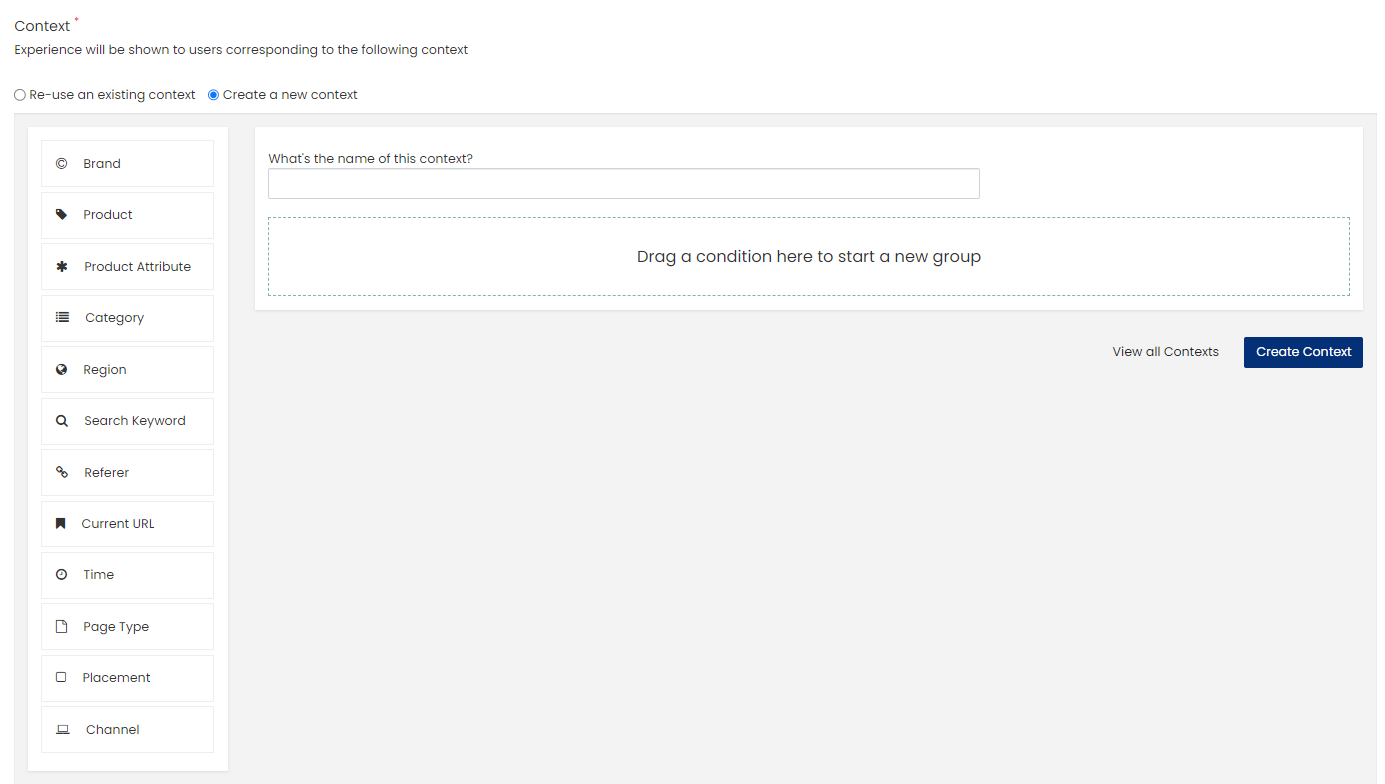
To proceed with creating a new context, follow these steps:
-
Specify a name to the context.
-
Drag the conditions from the left to the box that displays "Drag a condition here to start a new group".
-
Set up each condition that you have dragged in the box.
For more details about building new context, see Build Contexts.
-
Click Create Context.
-
-
-
Choose the segment to display the content to all the users, re-use an existing segment, or create a new segment.
- Show this content to everyone: The content will be visible for all the users on the site.
-
Re-use an existing segment: Define the custom target segment by selecting from the available list of segments.
-
Create a new segment: You can create a new segment based on your requirements.
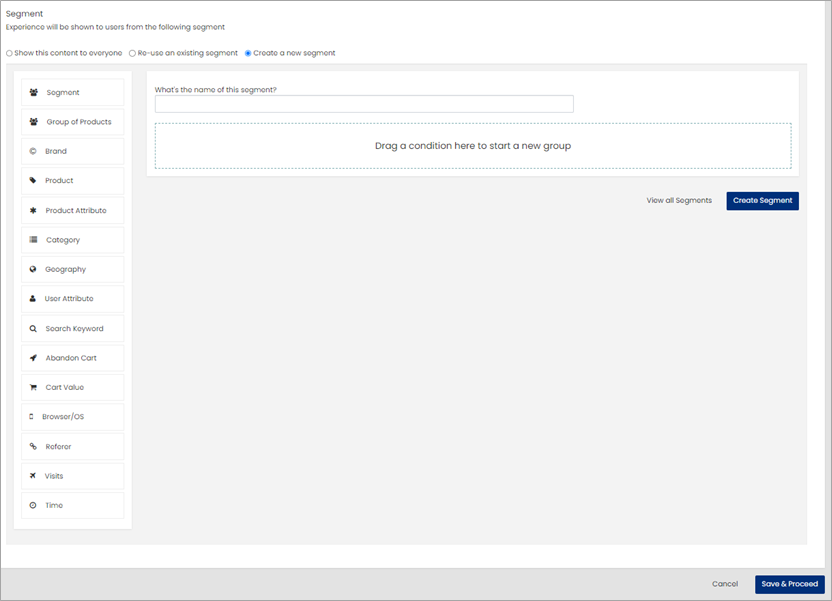
To proceed with creating a new segment, follow these steps:
-
Specify a name to the new segment.
-
Choose the target audience by dragging the conditions from the left to the box that displays "Drag a condition here to start a new group".
-
Set up each condition that you have dragged including any necessary constraints.
For more details about building new segments, see Build Segments.
-
Click Create Segment
-
-
Click Save & Proceed. The Message Type page is displayed.
The Message Type step allows you to configure and personalize social proof messages for various customer events, including Views, Add to Cart (ATC), Purchases, and Inventory Remaining. Previously, the functionality to display multiple messages was limited to the Item page, however it is extended to include other page types, such as List, Cart, Category , and Email pages.
Note: If any feature is unavailable in your social proof campaign, it is recommended to create a new variation to access recently added features, as older variations may not include new updates.

Perform the following steps to define the message type parameters for social proof message:
-
Page Type: Displays the selected page type in the Targeting step.
-
Enable Multiple Messages: Toggle this option to enable the display of multiple social proof messages one after another.
-
Display Time: Set the required display time for each social proof message in milliseconds when multiple messages are enabled.
-
Priority: Displays the priority of each social proof message.
To change the sequence of priority, click
 , hold it, and then move it either up or down.
 -
Type: Displays the metric type of social proof message such as Views, Add to Cart, Purchase, and Inventory according to the defined intervals such as right now, in last hour, today, and since last visit.
Note: In the social proof message, the intervals ‘right now’ refers to the last 15 minutes and ‘today’ refers to the last 12 hours. This can be changed as required through JavaScript.
Available event metric types are:
-
Views Right Now
-
Views Today
-
Views Since Last Visit
-
Add To Cart In Last Hour
-
Add To Cart Today
-
Add To Cart Since Last Visit
-
Purchase In Last Hour
-
Purchase Today
-
Purchase Since Last Visit
-
Inventory (For more details about Inventory Messaging, see Inventory Messaging in Social Proof)
-
-
Message Preview: Displays the preview of the text message that you want to display on the site.
-
Threshold: Specify the minimum threshold value that triggers the social proof message.
-
Show/Hide: Use the toggle button to select whether to show or hide the metrics based on the requirements of your social proof message.
-
Select Show if displaying the social proof message is likely to have a greater impact.
-
Select Hide if not.
For example, if you decide to show only two messages as part of your social proof messaging, set those two message types to Show and hide all others, ensuring that only the required message types are displayed.
-
-
Click
 corresponding to the event metric that you want to edit.
For example, to edit the Add To Cart Today event metric:
-
Click
 corresponding to the Add To Cart Today event metric. The Add To Cart Today window is displayed.
-
Specify the interval and select the interval unit from the dropdown list. Available interval units are minutes, hours, days, and weeks
Note: The message is displayed on the products being viewed by other customers within the selected configured interval. Ensure that only supported interval is specified.
-
(Conditional) Select Threshold or Range based on your preferences.
Threshold: If you want the message to appear when a specific number of products are added to carts today, use the "Threshold" option. For instance, set a threshold of "5" to display the message when 5 or more products are added.
Note: The message will show when the user count or event count equals or exceeds the specified threshold value.
Range: If you prefer a range-based approach, specify a minimum and maximum value. For example, set a minimum of "3" and a maximum of "10" to display the message when the count is between 3 and 10.
-
If you selected Threshold, then specify the following:

-
Set the minimum threshold value in the Threshold text box to display the social proof message on the site.
-
Specify the social proof message text in the Message Preview text box that you want to display on the site.
Note: By default, the user count is used as the metric for social proof messaging. You can switch between user count and event count based on your preference. For more details about dynamic count parameters, see Social Proof Messaging with Dynamic Count Parameters.
-
-
If you selected Range, then specify the following:

-
Set the minimum and maximum range for the add to cart today count to display the message. For endless range, select the No End Range checkbox.
-
Specify the social proof message text in the Message Preview text box that you want to display on the site.
Note: By default, the user count is used as the metric for social proof messaging. You can switch between user count and event count based on your preference. For more details about dynamic count parameters, see Social Proof Messaging with Dynamic Count Parameters.
Similarly, to configure an additional range, click Configure Additional Ranges. This allows you to set up multiple ranges for displaying messages based on the matching Range.
-
-
-
(Optional) Click Add additional Language to add a localized social proof message.
To add an additional language to display localized social proof message, follow these steps:
-
From the Choose Language dropdown list, select the language you want to add for localization.

-
Specify the social proof message text in the selected language in the provided text box.
Similarly, to include another additional language, click Add Another Language. This allows you to input the social proof message text for the new language in the provided text box,

-
Click Save.
This ensures that your social proof messages are accurately configured and tailored to your language preferences and localization needs.
-
-
-
Click Save & Proceed.
The Display Configuration step allows you to set up the styling and position of the social proof message.
Perform the following steps to set up Message Styling and Display Settings for social proof message:
-
On the Message Styling tab, set the following template variables and the group details:
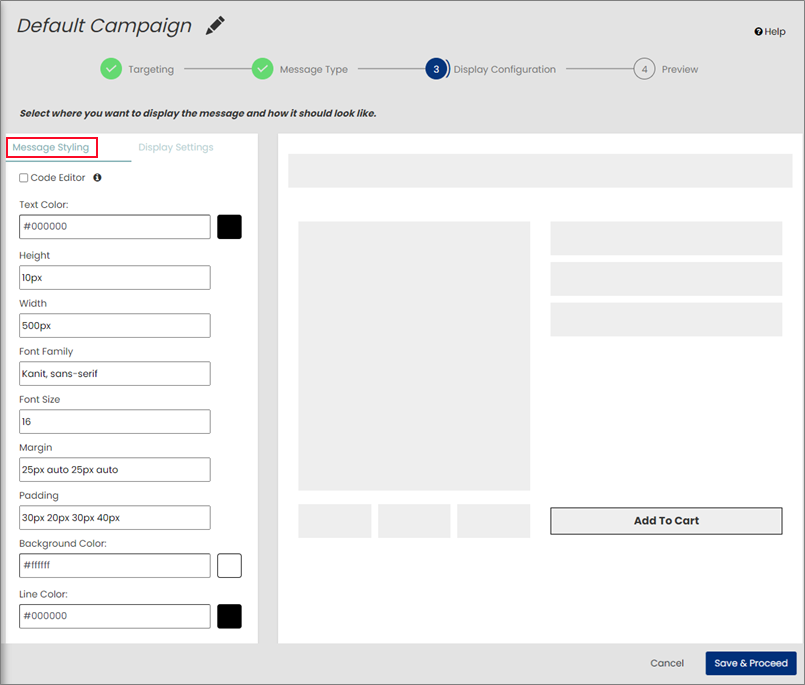
-
(Optional) Code Editor: Select the Code Editor checkbox to edit and customize the variables of social proof messages to display accordingly on the selected page type.
You can edit the code to customize the social proof messages through HTML, CSS, and JavaScript.

-
Text Color: Select the text color of the social proof message.
-
Height: Set the height of the social proof message text box.
-
Width: Set the width of the social proof message text box.
-
Font Family: Set the text font of the social proof message. For example, Kant, sans-serif.
-
Font Size: Set the text font size of the social proof message.
-
Margin: Set the margin for the social proof message text box with respect to the surrounding page component.
-
Padding: Set the padding (inner space) for the social proof message.
-
Background Color: Select the background color of the social proof message text box.
-
Line Color: Select the line color of the social proof message text box.
-
-
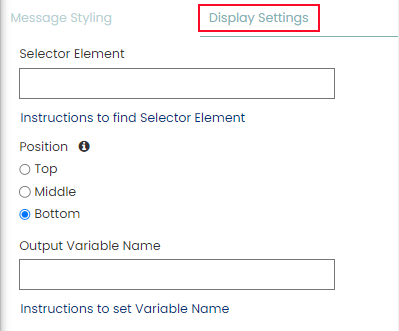
On the Display Settings tab, set the Selector element, Position, and Output Variable Name details for the social proof message.
-
Selector Element: The Selector Element is the location identifier where the social proof message will be displayed, such as a cart button or item image. It is crucial to select the correct UI component and identifier to ensure the message is placed accurately.
The location selector can be an XPATH, ID (prefixed with #), or class (prefixed with .) for the element where the social proof message will be inserted.
It is important to keep the following aspects while choosing Selector Element:
-
Identifier should be unique on the item page. If it is available in multiple places on the item page, then the message may not be able to show at the required location. Therefore, check if the selected identifier is unique or not. If not, select a different identifier.
-
If there is no unique identifier, add an identifier that is unique for the message location.
-
It should be followed by hash (#) for ID & and dot (.) for class. Tags can be used directly like p, div, etc.
-
-
Position: Select the position where you want to display the social proof message with respect to the specified Selector Element. Available options are Top, Middle, and Bottom.
-
Output Variable Name: Specify the output variable name for the social proof variation. The variable can be accessed using window.RR. For example, if the variable is named socialproofmetrics, it can be retrieved using window.RR.socialproofmetrics.data.
This function provides attributes such as message type, timewindow, user count/event count, threshold, message, priority, and show/hide, enabling precise control over the social proof variation output. This allows clients to utilize the message and render it on the website as required.

Ensure that the output variable name complies with the following naming conventions:
-
Variable name must start with an alphabetic letter, underscore (_), or a dollar symbol ($).
-
Variable name cannot contain spaces.
-
Variable name cannot be the same as reserved keywords such as if, const, and so on.
-
-
-
Click Save & Proceed. The Preview page is displayed.
The Preview page displays a summary of the campaign to be published for social proof, including the context and segment defined for the campaign, the start and end dates, audience traffic percentage, and other relevant details.
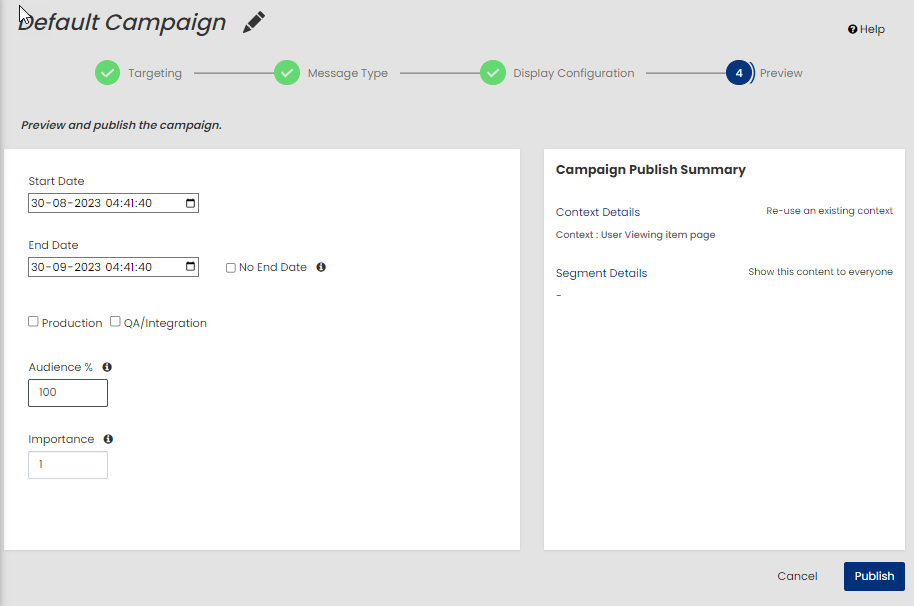
Perform the following steps to preview and publish the social proof campaign:
-
Start Date: Specify the start date for social proof variation.
-
End Date: Specify the end date or select the No End Date checkbox to run the variation indefinitely.
-
Production: Select this checkbox to publish the social proof variation to the production environment.
-
QA/Integration: Select this checkbox to publish the social proof variation to the QA environment.
-
Audience %: Define the percentage of traffic allocated for the campaign variation. By default, audience traffic is set to 100% for the first variation.
-
Importance: Specify the importance of the social proof campaign. In case of conflicting campaigns, the one with higher importance prevails. You can use decimal values for more precise importance settings.
-
Click Publish.
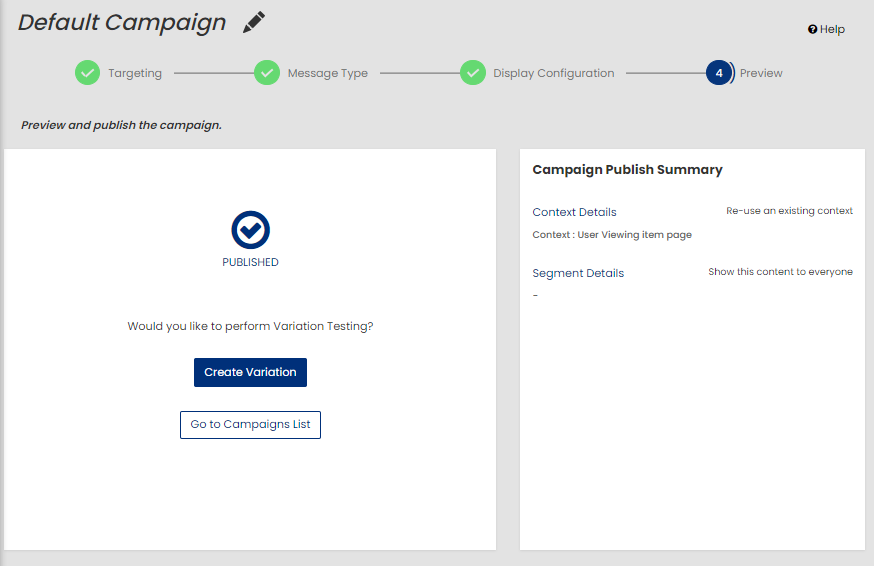
The confirmation page is displayed for the published social proof variation where you can perform the following actions:
-
To create a new variation for the same campaign, click Create Variation.
-
To view the created campaign in the list, click Go to Campaigns List.
-
To edit the campaign details, in the Default Campaign area, click
 . For more details about editing the campaign details, see Edit Campaign Details.
-